Posts

White Christmas Ornament

Image
This ornament is one of the things I made to give the Young Women at church an idea.  I had a lot of these ornament halves and offered that they could make ornaments along with the cards and the baby hats they were knitting.  The cards and ornaments are going to go to an assisted living facility when they go caroling next month.  The baby hats are going to be an ongoing project to donated to a hospital later. I used Crystal Effects to attach the ornament to the background. Stamps:  Holiday Home, White Christmas CS:  Soft Sky, WW Ink:  Tuxedo Black Misc.:  Markers, 2-way glue pen, dazzling diamonds, crystal effects, dimensionals, snowflakes (from craft store)

Christmas Tree

Image
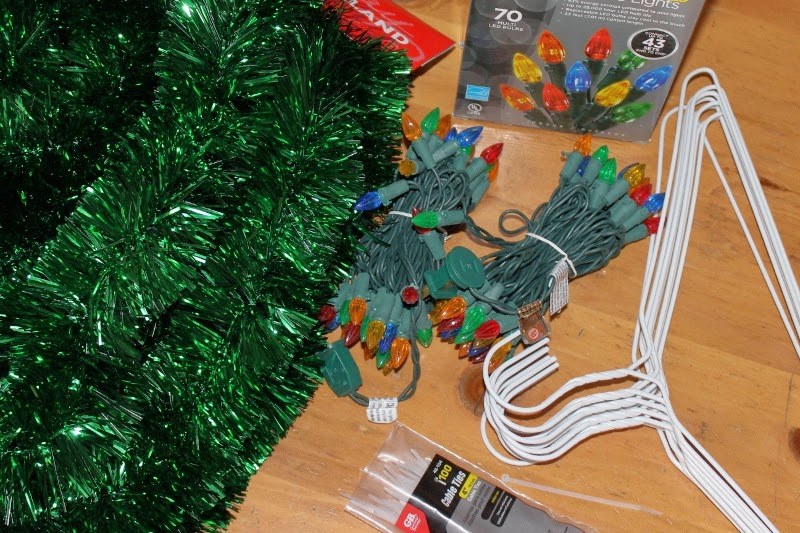
This seems to be the year for me to re-create crafts that I did with my mom or that she made.  In the early 80's, a friend of my mother's had us over and we sat at her kitchen table each making a tree like this.  I always liked that tree and decided this would be the year I would make it again. All you need to make it is 30 feet of plush garland.  6 wire hangers.  Zip ties or twist ties.  A strand of lights.  I think we used a strand of 100 mini lights so many years ago.  I've been debating this in my mind though.  50 seemed like it would be enough and 100 perhaps too much.  I was at the hardware store today and saw a box of 70 lights and figured it was middle of the road . . . perfect.  The bulbs were a little bigger than the typical strand of lights, this could work too.  Having made the tree I have mixed thoughts on the lights.  I would opt for the 100 bulb strand to have more lights, but then, I like lights.  I like ...

What Do I Do With These Kids

Image
About 10 years ago I attended a training either at a Pow Wow or a University of Scouting.  I've attended and taught at many of these over the years and have files of handouts. I had one of my handouts out before the move to generate some ideas for a Roundtable meeting.  I never put the papers back in my file but they moved with my office.  All is good, right?  It was until we got a puppy.  My papers fell off a pile I needed to take to another room and it ended up wrecked by the puppy.  I saved it and just typed it up so I can still reference it in the future.  I am not the author of this document, nor do I recall who taught the class.  I have verified the links and omitted things that were applicable to the area I was living in at the time.  Still a lot of good information for you. You can access the file HERE . Good thing she is cute! (The day we brought her home.)

Witch

Image
In 1985 my Aunt Beth taught my mom how to make a witch like this.  We were talking recently and I mentioned how much I liked that witch.  She told me she still had the directions and would be willing to teach me.  I was excited but knew it may be a challenge to find the witch face needed.  Google to the rescue.  After many different searches, I was able to find the masks.  They are 2-1/2" wide and 3-1/2" long.  The back is open so it is more of a half mask.  The face itself is the same as what they used in 1985 but this one was a harder plastic.  The face they used before was more of a rubber than plastic. You can see from the next picture a bit more of the mask and how we secured it.  We put 2 styrofoam balls in the back of the mask and taped them with masking tape to secure them.  A 14" (1/4") dowel went through the styrofoam to help support it while we shaped the dress.   We made a cone shape that would fit over a...

VC Rocks Bookmark Swap

Image
I hosted a swap called "Save That Page" a couple of months ago for VC Rocks.  I took pictures of all of the bookmarks are received thinking I would get the pictures posted while I was in a hotel room with nothing to do at night.  It was quite late by the time I we were settled in hotel rooms and getting on my laptop was not on my list of things to do.  We spent a week with my mom and by the time we got to where we were moving, we explored the area we would be living in, cleaned and painted the house waiting for our things to arrive.  It was a busy time.  I still need to finish my sewing/stamping area.  I'm missing a couple of boxes, one being my cardstock.  I need to go through our storage area to be sure it didn't get put there with the Christmas boxes. This first bookmark is by Brenda Hugar.  I took a picture of it closed and opened. Catie Palmer made a bookmark that has magnets on the other side of the circle.  I love that typ...

Papillon Potpourri

Image
Time is a little short for stamping.  There are so many details I still need to take care of for this move but this couldn't be overlooked.  My daughter celebrated her 16th birthday last month and I didn't have enough thank you cards for her.  Rather than a thank you, I made general note cards.  I saw a thank you card on Pinterest that used other supplies than Stampin' Up!  Have no fear, I could recreate it with what I had.  While I could have made the banner for the 'thank you' sentiment, I liked it without it. To make the scalloped square, I cut the CS to a 2-7/8" square. I went through a whole sheet of CS to figure out the dimensions to punch it easily.  The banner is 2-1/8" wide, I think 2" would be better.  To cut the bottom, I used my paper trimmer and cut in 1/2" into the center and then used my scissors to cut from one corner to the center and then did the other side. Stamps:  Papillon Potpourri Ink:  Jet Black CS: ...

VC Rock Blog Hop

Image
The challenge for this blog hop was to rock our creativity using Stampin' Up! punches or Sizzix dies.  I actually used both on this card!  I've had both the Circle Card Thinlit and the Label Card Thinlit since they came out but I haven't used them.  Today I opened the packaging for the Circle Card Thinlit and this is what I came up with. In the next picture, you can see I did a gate fold for it.  I measured the Tangerine Tango CS at 5-3/8 x 8-1/4.  I tucked the end away from the circle through the thinlit so it wouldn't cut, but fold it when I ran it through the Big Shot.  A little of the Retro Fresh This and That Washi Tape to jazz it up a little for a note. I ended up using the 1-3/4" circle punch as a stencil for the stamped image after it was colored.  I put the circle on top of the image, traced around it, jumping over where the leaf and flowers extended and then cut it with paper snips and mounted it with Dimensionals.  You can see in...