Posts

Moda Sampler

Image
 I finally put this quilt top together. I had 4 more blocks to sew together. I must admit that I was a little nervous to put this together. The instructions said to use 1/4" seams. I tend to sew with a scant 1/4", although I really tried to do a quarter inch. When you are dealing with the same size block, it isn't that hard to match up the seams, sew, and have a good finished look. This top has blocks as small as 6 inches and as large as 24 inches.  I happy to say that it went together beautifully. I did have one block that I had to finagle a little but otherwise, it whipped together and I can't help but wonder what I was worried about.

Christmas Wall Hanging - Stocking

Image
Stockings are one of my favorite things at Christmas.  I personally have not had a stocking in 30 years but how I loved them as a kid.  When you were waiting to open presents there was your stocking to look through with an orange in the toe of the stocking, nuts, candy, chapstick, little toys and games like a yo-yo, top, or those plastic squares that have the numbers 1-15 that you try to put in order.  A few years ago I put together a stocking for my mother as her Christmas gift.  It was fun to come up with things to include and to do the shopping for it.  I know she enjoyed it as much as I did.

Christmas Wall Hanging - Ornament

Image
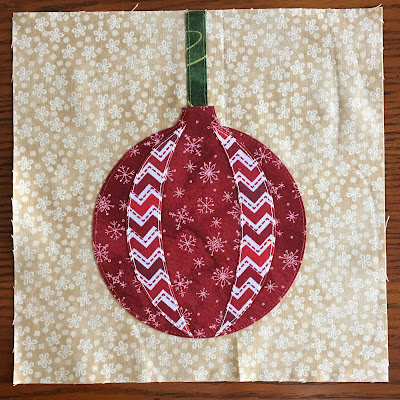
This block is 99.5% done.  There is a ribbon bow to tie and attach to the top of the ornament but it needs to be quilted before I can add the bow.  Quick block to do that makes you feel like you are making progress at a rapid rate.

Christmas Wall Hanging - Candy Cane

Image
 I usually decorate for Christmas the day after Thanksgiving.  With Thanksgiving being early this year, I've decided to wait a few extra days.  I'm hoping to finish a Christmas wall hanging by then.  I'm planning to have the 9 blocks appliqued by Thanksgiving and that weekend I will add the borders and quilt it.  My Christmas cards may end up going out a little later since I'm only half done making them.  Yikes! The wall hanging has a lot of nice blocks.  I started with my favorite of all the blocks.  I love this candy cane.  It makes me want to break out my Christmas books and read one we've enjoyed for years, "The Legend of the Candy Cane" by Laurie Walburg.  The book is beautifully illustrated and tells the symbolism of the candy cane and Jesus Christ.

Happy Scenes with Winter Woods

Image
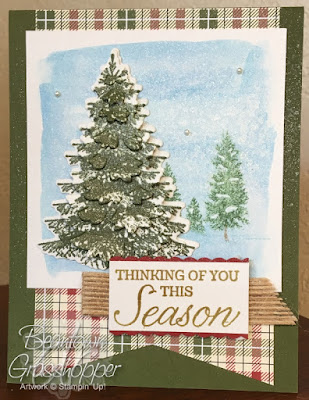
Less is more. haha I liked the card before I spritzed it with glitter spray.  I couldn't find my spritzer for another card because I forgot I moved it to another sprayer. The spritzer it came in clogged so I transferred it.  Well naturally when I came across it I had to spritz.  I wish I took a picture of this card before I did that. I like the tree die and how you can pop branches to give it dimension.  I saw this card on the Stampin' Up! site .  They used the Rooted in Nature stamp set for the background trees.  I don't have that set so I used the improvised with a retired set, Happy Scenes. Stamps:  Winter Woods, Happy Scenes CS: Mossy Meadow, Shimmery White, Cherry Cobbler, Festive Farmhouse DP Ink: Mossy Meadow, VersaMark, Blueberry Bushel Die: In the Woods Framelits Misc.: Gold Embossing Powder, Aqua Painter, Burlap ribbon, Pearls

Winter Woods

Image
Those that know me know I love glitter.  When I saw this card, I knew I wanted to make it.  My goal is to make 4-6 cards several times a week so that I have enough Christmas cards by the time I'm ready to mail them.  I'm up to 47 cards made so far.  Yay!! JanB of the UK posted a video on how to make this card.  She used an oval for shape layered on a green scallop oval for the sentiment.  It was late and I wanted to go to bed.  I opted for a punch and sponged on green. I like her way, but I'm fine with what I did too. The background trees are stamped in Sahara Sand.  I stamped once on the paper and then stamped again, higher and to the left a smidge and repeated to get the line of trees.  I stamped off for the bottom trees, which the picture doesn't really pick up. The green trees were stamped with Garden Green ink.  The top picture shows the marking with a white pen on the tree.  My gelly pen dried up.  I used the cha...

Dashing Deer

Image
I totally CASEd this from one of the Artisan team members.  There are a lot of details which make it a nice card.  I also like cards that use the designer paper since I tend to get it but rarely use it.  I had to re-stamp my deer for the die because I huff some air onto my acrylic block before putting on a stamp to help it stick a little better.  Well, I huffed too much and stamp slid around the first time or two of inking up and stamping.  The image wasn't lining up with the die well at all.  They lined up better the next time. Stamp Set:  Dashing Deer CS:  Cherry Cobbler (8-1/2" x 5-1/2"), VV (4" x 5-1/4"), Mossy Meadow (3-1/4" x 4"), Festive Farmhouse DP (3-1/2" x 4-1/4"), Wood Textures DP (3/4" x 7/8") Ink:  Mossy Meadow, Cherry Cobbler Dies:  Detailed Deer thinlit, Stitched Shapes framelit EF:  Tin Tile Dynamic Misc.:  Pearls, Linen Thread, Frost White shimmer paint, dauber On the very vanilla, you will want t...