Posts

Showing posts from 2016

End Piece of Gingerbread Cake Roll

Image
Perhaps it is pride that I need you to know this is an end piece.  The filling was fuller in the middle but I didn't put it all the way to each edge knowing as it rolled up it would squish out.  That said, there was still enough filling that it was enjoyable to eat.  I usually cut off the ends before serving to be sure that it looks as appealing to the eye as possible. I made this dessert for a Christmas party.  The ends I had cut off were all I had since what I took to the party was eaten.  My kids, while they enjoyed it, wished it was sweeter.  This is why I like it because this is a season of sweetness and it was nice to not be overwhelmed by it. Gingerbread Cake Roll Cake: Cooking spray Parchment paper Shortening 2/3C Cake flour 1-1/2t Cinnamon 1-1/2t ground Ginger 1/2t Baking powder 1/4t Salt 1/4t ground Cloves 1/4t ground Allspice 4 large Eggs, separated 1/2C Sugar 3T Molasses 3T Butter, melted 1t Vanilla 1/3C Powdered sugar Syrup: 1/4C Sugar 1/4C

Snowman Candy Dish

Image
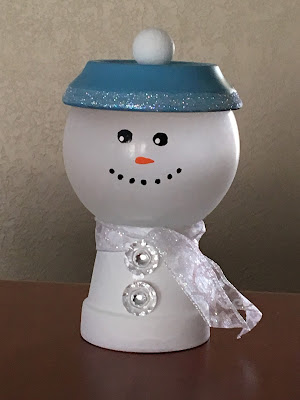
We had an activity last month for those that wanted to make these candy dishes.  I made one for my husband to use on his desk at work.  We spray painted the terra cotta flower pot (base of snowman) and the saucer (hat) with spray paint.  While they dried we painted the wooden knob for the hat and the face on frosted glass bowl.  I think they bought clear glass bowls and they sprayed them with a frosted finish.  Once everything was dry we glued the knob on the saucer.  We glued the face to the flower pot base and attached a ribbon.  I brought mine home and added some dazzling diamonds glitter to the rim of the hat and I used some Stampin' Up! buttons and rhinestones to jazz him up a little. I put some of the peppermint butter mints in it for him to take to work but I also sent a bag of M&Ms.  He told me the candy went a lot faster when it was the M&Ms.

Hang Your Stocking

Image
I'll be honest with you.  I hesitated on this set.  Remember a few years ago they had a stocking set.  I really liked that set and I struggled to come up with cards for it.  I had CASEd a card from Janine T. (I noted others used her card for this stamp set as well.)  The nice thing about the older set was it could be used to make a baby bootie for a shower card.  I think it was the embellishments that sold me on this. Stamps:  Hang Your Stocking CS:  WW, Garden Green, Real Red, Basic Gray, Smoky Slate, Mint Macaron Ink:  Real Red, Garden Green, Smoky Slate (stamped off) Thinlet:  Christmas Stockings Stamps:  Hang Your Stocking CS:  Mint Macaron, Cherry Cobbler, WW, Presents & Pinecones DP Ink:  Cherry Cobbler, Emerald Envy Thinlet:  Christmas Stockings Misc.:  Linen Thread, Banner Punch

Cookie Cutter Christmas

Image
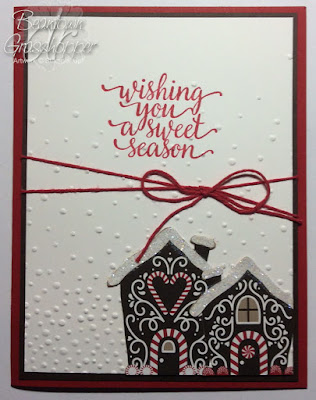
I knew when I saw this set that it would get a lot of use.  What I didn't count on was the designer paper being so useful on its own.  Look at the above card.  Cut out two houses from the paper, add a little dazzling diamonds to the roof for snow.  Stamp a greeting and run the paper through the Big Shot and you have a simple and yet cheerful card. While I anticipated using the gingerbread man a lot, I didn't think I would take to the reindeer as much as I did. Stamps:  Cookie Cutter Christmas Punch:  Gingerbread Tape:  Warmth & Cheer CS:  Real Red, WW, Crumb Cake Ink:  Early Espresso Misc.:  Linen Thread I like this card.  So simple and cute.  Maybe it is the red glitter paper for the bows.  Maybe it is the designer paper with the candy cane hearts.  The contrast of the colors.  Whatever IT is, it makes me happy. Another great card with tape, punched out designer paper and the mint candies stamped and punched.

Christmas Card

Image
As I prepare to address the envelopes for Christmas cards, I can't help but to be grateful for Pinterest and those that share their creations.  I CASEd many ideas and used some for inspiration swapping out sets.  This card I liked for its simple elegance.

Christmas Pines

Image
Stampin' Up! has so many great sets to make Christmas cards with.  I decided to play around with this set because I have been using the Pretty Pines thinlit dies that coordinate with it.  I got this stamp set to go along with the ornament stamps.  I should have used the dies to cut out the pine cones but it seemed easier to cut them out myself. For the pine cones I stamped off the crumb cake on the first image and I stamped off tip top taupe for the second layer.  The third layer is regular stamping of tip top taupe. Stamps:  Christmas Pines CS:  Real Red, WW Ink:  Crumb Cake, Tip Top Taupe, Mint Macaron, Emerald Envy, Garden Green Misc.: Dimensionals, Glue Dots, Real Red 3/8" woven satin ribbon

Thankful

Image
I needed a simple card that young girls between 8-10 could make to write thank you notes in.  Another leader gave them a lesson on Thanksgiving and they watched a short video of random people in NYC being asked what they were thankful for.   I knew I wanted to use the big shot because kids are always dazzled with it.  I turned to Pinterest to see if I had pinned anything that I could get together easily enough.  I had pinned this card but it is only a picture, from the URL , you can't tell who shared it.  I can't give proper credit but it was perfect for my needs. I cut all of the cardstock ahead of time and adhered the burlap ribbon to the cardstock.  They needed to punch the circle and stamp, sponge and cut the leaf.  As expected, they enjoyed running the card stock through the big shot to add texture. Stamps:  Gently Falling CS:  Crumb Cake, Chocolate Chip, Garden Green, WW Ink:  Chocolate Chip EF:  Square Lattice Thinlit:  Expressions Misc.: 1-3/4"

Lavender Quilt

Image
We moved 3/4 of the way across the country this summer.  The girls had a short summer with school ending at the end of June.  They were at camp the last week of June/first week of July.  Their grandmother that was visiting us in June ended up in the hospital 2 days after her arrival and was there for 25 days.  When she was released we had her for a few days and she flew back home.  Two days after she left they started packing our belongings and the truck was loaded few days later. This is my first quilt project in our new home. The top is 90" x 110" Blocks 1-4  Blocks 5-8  Blocks 9-12 I'm glad I finally got around to making it.  I bought the fabric over 2 years ago.

Hummingbirds

Image
I took some time this afternoon to sit on the patio and watch the hummingbirds at the feeder.

Roadrunner

Image
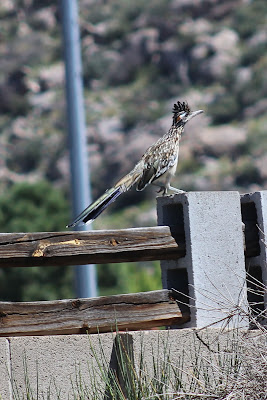
A lot of unpacking to do but I snapped a fabulous picture of a roadrunner in our backyard today. This next one isn't as good but look at the colors on the tail feathers.

Cemetery Visits

Image
On our way across the country we stopped at a couple of cemeteries.  One for my great grandfather who died when he was 37 from a mining accident.  He was in the hospital for 10 weeks before passing. The above picture is from a cemetery in Pennsylvania.  This memorial is for my 9th great-grandfather and his family.  It was erected over 100 years ago.  Driving through the area I was overcome with emotion and was crying.  By the time we got to the cemetery I was back to normal.  I have spent over 25 years researching this family.  I wasn't having success in the beginning because I was researching the wrong name.  In the south they call a creek a crick.  When someone mentioned my great-great-grandmother's maiden name was Crick the family wrote it as Creek.  It wasn't too far off but 25 years ago research wasn't done on the computer when they gave variations of names. I'm very glad that we took the time to come to the area.

Matthew's Block

Image
There is a quilt sampler sew along going on right now called the Splendid Sampler .  I believe it  It started in February and will continue on into next year.  There are 100 blocks and some bonus blocks.  This bonus block was released May 31st.  I altered the sizes a bit to make it a little smaller for a mug rug.  Fun little block to put together.  I don't think I've ever worked with such small pieces.

Flag Wall Hanging

Image
I saw a flag made of tumbler blocks on a quilting site, or perhaps pinterest.  I like how the tumbler blocks give the illusion of the flag waving in the breeze.  With family coming for graduation and a move coming up, I don't have time to tackle a larger quilt project so I opted for something small and satisfying.  I'm very pleased with this project!

Youth Auction

Image
I posted about the youth auction last year.  How fast the time goes by. One of our girls made caramel brownies.  She made 2 batches so she could cut a piece and people could see the caramel layer.  This recipe is divine! I made a Dr. Suess quilt for it. I bought enough material so I can make another one for one of my grandkids (probably another 7 years before I have one but you can never be too prepared. haha) Another one of our girls made Mississippi Mud Cake!  Takes me back to my childhood and my grandmother.   Our oldest daughter, while not going to camp and needing funds, contributed a tin of cards.  Since the cards were in the tin, this paper was out to show bidders what they were getting.  Several Paper Pumpkin cards in this tin.

Craft Challenge

Image
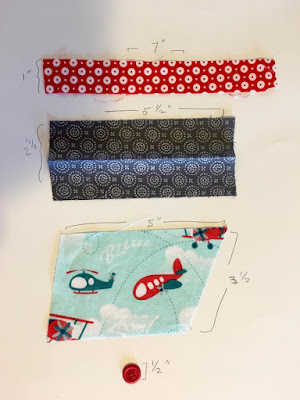
Last month I participated in a craft challenge.  The organizer of the challenge sent everyone the above materials.  I have to admit that I was stumped.  The scraps were pretty small and nothing came to mind of what to do with them.  I saw some brilliant submissions that were so clever.  I decided to make a mug rug and a card.  The mug rug is 5-1/2" x 5-1/2".  I need a big one because I drink from a plastic insulated quart jar.  I'll need to find a new cup soon as both of mine are leaking when they are full.

Project from 2013

Image
January 2013 I joined a "Saturday Sampler" at a local quilt shop.  Each month you were given a block to do and the following month if you came back with the completed block, they gave you the next block to put together for free.  If you didn't have the previous block done, you could buy the block kit for that month.  I'm thinking it was $7 or $8.  I'm not really sure because I'm motivated by "free" to get things done. There was a Log Cabin bundle of material available to make 23 log cabin blocks.  I'm thinking the instructions must have said to make 24 because I had that many and only 23 were needed to make the quilt below. When I assembled this quilt, I wasn't in love with the yellow diagonal stripes but I did like how the blocks stood out.  I changed the layout of the blocks and used the 24th log cabin I had previously made to complete this new design.  I liked this layout but it was too yellow for me and I felt like the blocks were mu

Valentine's Day Cards

Image
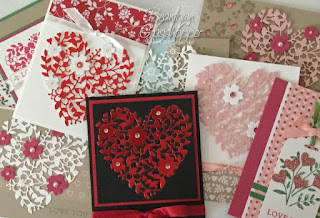
I'm doing one lump post on these Valentine's Day cards or I will never get around to it.  A couple are from Pinterest, one is from the catalog.   This card I used the sticker sheet on a back layer (I used white and should have gone with black but originally it was going to be a white card).  I cut the heart in foil red and in black.  I mounted the outline of the black heart on the piece of white cardstock and then inserted the red foil heart.  I then used all of the little pieces of black that were cut out to fill in the red heart.  It looks nifty in person to have the image filled in. Die:  Bloomin' Heart CS:  Basic Black, Real Red, Red Foil, WW Misc.:  Real Red Ribbon, jewels Stamps:  Bloomin' Love Die:  Bloomin' Heart CS:  Crumb Cake, Rose Red, Blushing Bride, Love Blossoms DP Misc.: Sequins (left over from Paper Pumpkin), Pearls, Dimensionals Die:  Bloomin' Heart CS:  WW, Fresh Prints paper stack, Red Foil Misc.:  Pearls, red seq